Insta360 Bullet Time Shots Tutorial
11:33 AM
In this Gimbal Guru tutorial, I show you 9 ways to create high quality Bullet Time Shots with your Insta360 X3*! Bullet time Shots are unique Matrix-like SloMo Shots that you can create with your Insta360 camera, which will definitely amaze your viewers.
To create bullet time shots, grab the Insta360 X3*:
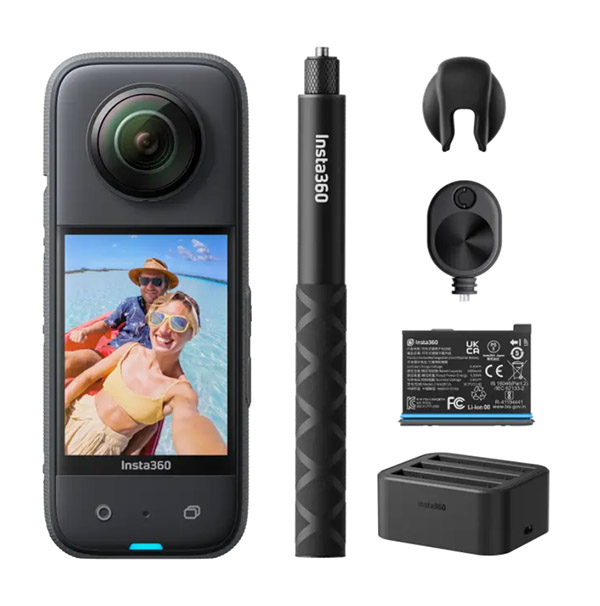
The Insta360 X3* is without a doubt the best 360 camera currently available on the market. It is the successful successor of the Insta360 ONE X2*. Numerous improvements and enhancements have been made, making the Insta360 X3 a true 360-video and 360-photo beast!
Get the Insta360 X3 in the Gimbal Guru Deal:
*Insta360 X3 special Deal*
*Insta360 X3 special Deal*
It is a powerful, versatile waterproof 360-action-camera packed with features to capture your adventures in stunning detail.
Check out the full Insta360 bullet time video:
9 creative BULLET TIME Shots | Insta360 X3
In this Gimbal Guru tutorial I show you 9 ways to create high quality bullet time Shots with your Insta360 X3!Insta360 X3 Bullet Time
A major improvement of the Insta360 X3* compared to the Insta360 ONE X2* is the bullet time update. The ONE X2* allowed you to record bullet time shots in 3k@100fps. The new Insta360 X3* allows you to shoot bullet time Shots in 3K@180fps or 4K@120fps. This is a huge step forward, as the higher frame rate and larger resolution allow high quality crisp bullet time Shots.


Basically, there are 2 ways to create bullet time shots. Either with the Insta360 Bullet Time Accessory*, or you can use the Insta360 Bullet time cord*.


Then select the "Bullet time" mode and set the desired resolution and frame rate. I prefer 4K@120fps because the 4K resolution gives better results and the 120fps is enough for the desired SloMo effect.
Now comes the creative part. There are many ways you can use the bullet time effect. Here are 9 creative ways:
1. Static Bullet Time

The easiest one is to place yourself anywhere and circle the Insta360 X3 over your head. This can be used, for example, to present the landscape.


2. Dynamic Bullet time

To make the whole thing a bit more dynamic, swing the Insta360 X3 over your head while running. This gives you moving bullet time Shots, which are amazing to watch.


3. Throwing Bullet Time

A very interesting bullet time idea is when you throw or kick something in the air and film it. It's best to use water, leaves, confetti, soap bubbles or other things. These Shots look great and are easy to create.


4. Water Jump bullet time

An impressive trick is when you jump into the water with your Insta360 X3 and create a bullet shot. Here I would recommend you to use 180fps to achieve a maximum SloMo effect. The more water splashes the more spectacular it looks!

5. Jump over bullet time

The jump over bullet time leads to awesome perspectives. To do this, first circle your Insta360 X3 above your head and then quickly move it down and jump over the bullet time cord. Watch out/ Only for athletic users! If you are not careful, your Insta360 X3 can drop to the floor.


6. Vertical bullet time

The bullet time effect can also be applied vertically. Simply hold the bullet time cord sideways and rotate it. This also creates interesting perspectives.


7. Bullet time switch

The various bullet time recordings can also be combined into a transition. To do this, you simply have to take bullet time shots in different landscapes and accelerate it to combine it into a bullet time switch transitions.

8. Object Bullet time

Also, very interesting and another way to use the bullet time effect. Place an object in the center and let your Insta360 X3 swing around the object.


9. Jump Over Bullet time

A jump over bullet time is similar to a dynamic bullet time, except that you also jump over an object while running. This way you get impressive shots.


Postprocessing

I use Insta360 Studio for this, alternatively editing in the Insta360 app is of course also possible. In the first step import your created bullet time recording. Insta360 Studio recognizes the format and stabilizes the recording automatically.

And now comes the most important step for high quality bullet time shots. Change the aspect ratio to 9:16. Compared to the 16:9 format, the quality is much better.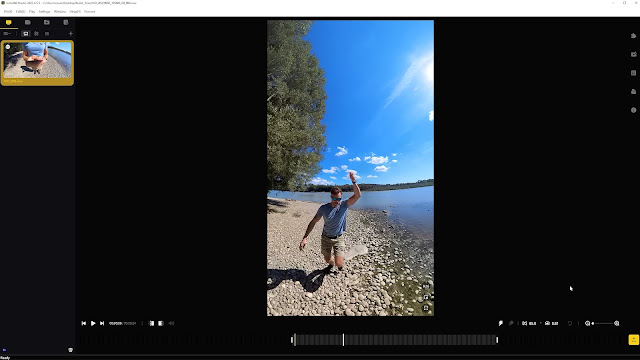
With the two parameters FOV Control and Distortion control you can improve your Bullet time Shot. 


My recommendation, where I have achieved the best results:
- Set the FOV Controller between 100° and 105°
- And the Distortion controller between 0.6 and 0.65
Here is an additional gimbal guru tip:

Export the bullet time sequence to ProRes 4K. Exporting in 30fps will allow you to play back the video in your video editing program at 24fps, which will slow down the recording even more. This way you get the maximum out of your bullet time shots.


Get the Insta360 X3 in the Gimbal Guru Deal:
* = Affiliate Link


0 comments