Insta360 ONE X2 | HYPERLAPSE TUTORIAL
1:18 PM
I experimented creating hyperlapse videos with my Insta360 ONE X2* and here I show you my results + a tutorial how to create hyperlapse/ timeshift videos with your Insta360 ONE X2*. To anticipate, I'm once again impressed by the Insta360 ONE X2*.
Check out my Insta360 ONE X2 - "HYPERLAPSE TUTORIAL" here:

If you also want to create such amazing hyperlapse videos with minimal effort, watch this tutorial. Here I’m going to explain all the steps and my workflow, how I created these impressive hyperlapses with the Insta360 ONE X2.

In the first step I mounted my Insta360 ONE X2 on the Selfie Stick and extended it. Then I turned on the camera and selected the standard video mode with the highest resolution in 5,7K.

I recorded the 360-videos in the automatic mode, because this leads to the correct exposure even when the lighting conditions are changing, which can happen if you record a Timeshift video.

Press record and start moving foreward to create your Hyperlapse. You can mount the camera where ever you want, or use it handheld with your telescope stick. I recommend you to record at least 10 minutes or more.

After you finished your recording, the main hyperlapse refraiming process happens in post- production.

For this tutorial I decided to show you the process in Insta360 Studio, but you also can create the same hyperlapse videos with the Insta360 App or other programs like Adobe Premiere Pro or Adobe After Effects.

First open Insta360 Studio and import your recorded 360 video. Make sure the Flowstate Stabilization is activated and Lock direction deactivated.


Make sure the Motion blur effect is activated, for processional locking hyperlapses. When you now playback the video the speed and motion blur effect is not previewing correctly. Be patient, you see the final results, after you export the video.

Now the creative reframing part starts. Click on the keyframe button to set your first keyframe at the beginning. I recommend you to select the “natural view” for a dewarped wide angle view. If you want to get an even wider angle, you can increase the FOV value.


Then set your second keyframe and reframe your video however you want. You can add as many keyframes as you like. When you hold down the timeline cursor on move through the timeline you see a preview of your hyperlapse.

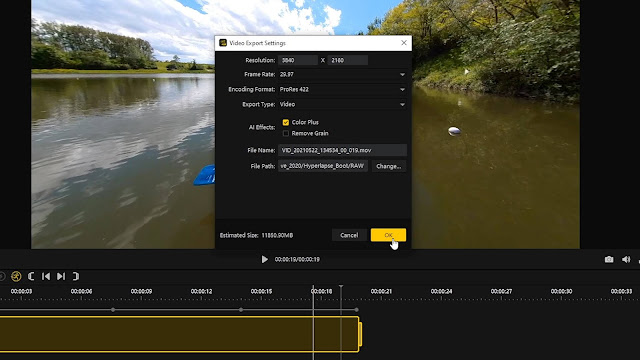
To get the final result you had to export the video. Click on the export button and select your desired export settings. I normally change the resolution to 4k and select the ProRes 422 encoding format, for the best export quality. You can also select “Color Plus” for stronger colors.

Then click “ok” to export the video.
When the export is finished you can enjoy your awesome reframed hyperlapse.
Get creative and try it out yourself! I’m looking foreward to see your hyperlapses. Feel free to share it in the comment section!
*Affiliate Links

Get creative and try it out yourself! I’m looking foreward to see your hyperlapses. Feel free to share it in the comment section!
If you’re motivated to get your Insta360 ONE X2 now, check out the link:
Attention: To redeem an Insta360 coupon code, click here and save up to $30 and more!
I hope you liked the video and learned something new. Subscribe to my channel for more !
Subsribe to my Gimbal Guru Youtube-Channel for more Insta360 ONE X2 tutorials, tips & tricks. I see you in the next video!
*Affiliate Links


0 comments